Tuesday, December 13, 2011

Tyler's Birthday

     My wonderful husband turned 25 last week. He is growing up to fast ha ha. His birthday was Thursday and I took him out on a date. First we went out to family dinner with Sophia. We dropped her off at the babysitters then we went to see Planet of the Apes at the dollar theater. I have been avoiding seeing that movie because the old one creeps me out and I thought this one looked way creepy to. It was surprisingly not as creepy as I expected. Then we went to the Nickelcade and played with a bunch of old school video games. It was a blast! We laughed really hard at all the old games but we had a really good time! 


     That was only his fake celebration, although it was fun to go out on a much needed date. Hanna and I decided to throw him and Eric a combined surprised birthday party on Friday. Their birthday's are a week apart, and they were both turning 25 so it was perfect. The party was themed 80's throwback! Since they were born 1986. We didn't have a dress up party but we did dress up little miss Mia and Sophia in 80's gear!


     For food we did a french fry bar and a nacho bar. The boys always have chili cheese fries when they get together so we thought it was fitting. We found some old 80's candy  for everyone to eat. We also drank Tab and Capri Suns, which were all from the 80's. One of my favorite things at the party was the cassette tape labels, how cute are they?! 


     We also set up an 80's photo booth that everyone could dress up and take pics in. It was hilarious! Some of the outfits weren't so much 80's as they were silly but we still had a good time.


     Tiffany and I were in charge of making the cake for the party. We made a rubics cube cake. It turned out really cute. Everyone loved it. I don't ever actually eat the cakes I  make but I hear it was delicious. I don't know why, I think maybe it's because I work all day with it so the last thing I want to do is eat it? I love it when other people enjoy it though.


     All in all the party was a success. Tyler was actually surprised which is a first for me! I am not a good liar, especially when it comes to Tyler ha ha. It helped that I had a second person to blame everything on. I just told him it was all for Eric and he didn't even think twice about it. Success! Happy birthday again husband! You are the best man a lady could ask for I am so lucky to have you in my life! 


Saturday, December 10, 2011

Family Pictures

     SO finally after three failed tries we got our family pictures done! It was freezing cold, and we got kicked out of our spot by the cops, but we got some done and they turned out great. Thanks so much Hanna for putting up with the cold weather and spending your Sunday afternoon with us! 


     Sophia did really well, she was in a great mood and she just wanted to run around rather than sit still and take pics, but we did get a few of  her smiling.


     Tyler made the Merry Christmas sign! What do you think? I was pretty proud of him. I gave him a little direction but he pretty much did it all. I told my husband he would be super crafty before he knew it, he wasn't so sure about that. ha ha Anyway maybe I'll do Christmas cards now so everyone can see how crafty Tyler has become. 


     Oh also if any of you are interested in some great pics done by Hanna Here is a link to her blog. Her prices are so good and she does a great job! Thanks again Hanna! 

Monday, December 5, 2011

Quiet Book part 2

     So as promised here are the rest of my Quiet book pages! I wish I had a better camera because these are so much better in person. 


     Isn't this purse cute! Sophia loves my keys and want's to play with my credit card anytime I pull it out so I figured this was a great idea. I used some old gift cards and keys that she could play with. 


     I think this is my favorite page! How cute is it! All the buttons correlate with the color of the felt flower. So she matches colors and leans to button at the same time.


     This is one of the pages that is much cuter in person. She can put her little hand in the mitten. It's cute cause she loves to try putting on her own socks and gloves, I think she will have a lot of fun with this page.


     This one is a picnic basket and she is supposed to unpack it and set a place setting. 


      This one is so cute too! It's a counting one and she counts the cupcakes as you bake them in the oven.


     These next pics you guys already saw but I just wanted to show you how cute they are now that I added the eyes to all the animals. 


     This one I added little button flowers in the grass. I felt like the little details made a huge difference. I tend to curse myself for being so nit picky but in this case I love that I was! It made all the difference! Now I just need to bind the pages and make a cover for it. 


       Sophia has been trying to play with it the last few days. She knows it is for her, I think she is getting impatient ha ha. I can't wait to finally give it to her. Making Christmas presents has been really fun, time consuming, but fun. I feel like my gifts are so much better and I am so much more excited to give them to people! I have some more done but I can't show you yet because they are for certain people who read my blog. 


     On a side note I finally got family pics done after three failed tries! I can't wait to see them and I'll post them as soon as I get them! 


              ~A

Wednesday, November 30, 2011

Quiet Book

     For Christmas this year my husband and I decided to try and make all our gifts. We are hoping to save a ton of money by doing this. Especially since we have a ton of things to celebrate at this time. My husband's birthday, Christmas, New Years, my birthday, our Anniversary, then Valentines Day. All back to back. So we try to do Christmas super cheap, especially while we are in college. 


     Originally I was going to make this quiet book before Christmas but at the rate I am going I decide just to make it a Christmas gift. Plus it made it one less gift I had to figure out. I started by looking up some ideas on Pinterest and then just went for it. I am loving the way it is turning out! 


     With the lady bug you grab her spots from under the wings and attach them to the dots on top of the lady bug.


     This one you catch the butterflies in the net. I still want to add some flowers to the hill but you get the idea.


     This little barn is one of my favorites. You open the door and inside are finger puppet animals. I still need to add some googly eyes to the puppets, but again you get the idea.


     This one you pull out the pieces of the caterpillar from the cocoon and line them up on the branch so he can eat his leaves. Again, I need to add a face still. 


     I love this one too. You match the cute fish in the fishbowl with their coordinating colors. 


     I thought this one was very appropriate since I am a cosmetologist. She can braid or brush the girls hair and add flowers to it, just like I do with her hair. 

     It's been really hard not to give it to her right now. I am so excited for her to be able to play with it!  I love the way it is turning out. I have six more pages that are almost done and I'll show you guys as soon as I am finished! 


     ~A

Monday, November 28, 2011

Thanksgiving

     I hope everyone had a wonderful Thanksgiving. We sure did, but I of course forgot to take pics of it at all. We ate tons of food, Hung out with all of my family, stayed the weekend at my moms, set up Christmas decorations, went shopping, played games, and had our first eggnog of the season. All around it was a fun weekend break! 


     We did go black Friday shopping, it actually started Thursday night this year at ten pm. It was insane of course, but we got some really good stuff and saved tons of money! We love going every year. I have to say though I really hope they just change it back to early morning Friday. I like it much better than all night Thursday night. 


     We did set up our Christmas tree the next day. I figured Sophia would be all over the ornaments, but she has surprisingly not been. She does like to go up and touch them but she leaves them on the tree. I even have presents under it and she hasn't even touched them at all. 


     We did green and silver with giant green sparkly snowflakes, which I love! I also used all plastic balls so even if Sophia does start to grab them off the tree they won't break. Which is nice not to have to worry about. 


     We also stopped by the annual lighting festival at the Riverwoods in Provo. They had tons of fun activities for kids and they had Santa. I only took this one picture because my Camera is crappy and in the dark nothing showed up good. It was a lot of fun though they had face painting, balloon animals, free carriage rides, a bell choir, Santa Clause, and they were giving out all kinds of free yummy treats! It was a lot of fun and Sophia and dad had to try out all the motorcycles out on display. 

     The only down part to our whole weekend was Sophia caught a cold. Probably from on of the many cousins she was around all weekend. So this week we will spend lots of time cuddling in our sweats and recovering from her cold. That's the best part of having a sick baby at home.

              ~A


Tuesday, November 15, 2011

Lace for days skirt adjusted to toddler size

     I am sure you all know the amazing Leanne Barlow of Elle Apparel, if you don't know her blog is here . She has lots of fabulous tutorials and an Etsy shop that sells her own handmade and personally designed clothes! Here are a few of my favorites!


     Aren't they gorgeous?! I love stripes! I am pretty sure this cardigan is going on my Christmas list. Anyway she made this gorgeous skirt called lace for days, and made a tutorial for it. 


     Isn't it stunning?! I love it and fully intend on making myself one as soon as I find some lace I fall in love with. Well I was at one of my favorite stores the other day and found some red lace and fell immediately in love with it. The problem was it was only about an inch wide. I had to get it though. So I decided I would make a lace skirt for Sophia out of it. It turned out perfect! I am in love with it. I had to tweak a few steps to get it to work the way I wanted it to. Leanne has been gracious enough to let me use her tutorial and my tutorial combined to show you how I made it. So enjoy and I hope it makes since!   

     If you want to just make yourself one and not a little girl one go here. That is the link directly to her Tutorial. 
     

     The tutorial will go like this, whatever steps of Leanne's tutorial I used I will just link back to her post since they are her original steps. Whatever I changed I will post on here. 

     What you will need: 

~ Depending on the size of your little girl, 1/2 yrd - 1 yrd of fabric that matches your lace. Sophia is 18 months and I got a half yard and it was more than enough! 
~ 4-5 yrd of lace depending on thickness. 
~ 1 inch wide elastic about 10-12inches of it.
~ 1 larger Button, 2 small buttons
~ Skirt to measure with for your little girl use a skirt one size bigger than she is.
~ Zipper

Step 1: Measure skirt  

    Here is the link to Leannes step one.  I just want to make a note of a couple things. If your skirt has elastic in it make sure you stretch it out when you measure it for your pattern. Also while you are cutting out cut out one piece of elastic the length of your waist band.

Step 2: Cut out Material


Step 3: Lace, This is where I strayed from Leanne's. 

     Take your two skirt pieces and cut out your strips of lace. Look at Leanne's Step Seven and she gives you some tips on cutting lace. Do cut out two pieces for front and back like she said. DO NOT sew up the sides of the lace, we will take care of that later. 


Step 4: Sew lace to skirt

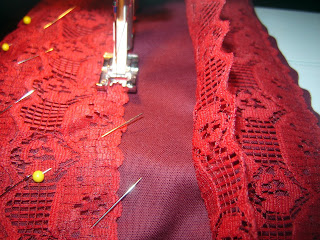
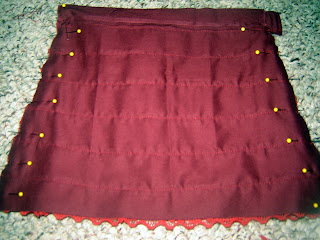
     Pin the lace on both sides of your skirt. Making sure the bottom of the previous row gradually overlaps the top of the next row. 


     I pinned all of my lace on first then sewed it but you can do it row by row if that is easier for you. Anyway sew along the top of each row, till all your lace is connected. 


     It should look something like this when it is done.

     
Step 5: Hem 

     Now you are going to hem the bottoms of your pieces. I know it's kinda weird to hem them when they are apart but it will make your life easier. Leanne shows you how is Step 5. I only hemmed a half an inch instead of the full inch under that she did. Just make sure that you do it exactly the same on both pieces so they match up when we sew the two pieces together! 

Step 6: Waist Band

     Take the two shorter waist band pieces sew along the top, iron the seam then turn right side out and iron down. Do the same with the two longer pieces. 

     Now attach the longer piece to the front piece of your skirt. Make sure you leave the extra inch hanging off the edge. Don't center it. Iron the waist band seam so the waist band is nice and crisp and lays flat.


     Now here comes the tricky part. Before you attach the other waist band to the back we are going to add buttons and a slit. So unfold your waist band and attach a small button to both ends. Then right next to each button sew an inch wide button slit to fit your elastic in. Make sure you do this on both ends of your waist band!! Fold your waist band back up and attach to the back piece of your skirt, making sure the buttons and holes will be on the inside of the skirt. 


Step 7: Sew together

    Now pin the right sides of your skirt together. Make sure you align your skirt really well so everything is lined up when you flip it right side out. Sew all the way up the side that doesn't have the extra inch. The side that does stop sewing at the point where you want your zipper to be. I went a little more than halfway up my skirt then stopped.

Step 8: Zipper

     Leann has a great link on how to insert a zipper. Over on Step Six. Have the top of the zipper start at the base of the waist band not at the top of the skirt. I added the zipper at the last minute because this lace and fabric has no give. I know having a zipper and elastic is like double duty but I really wanted to make sure the skirt would go over Sophia's diaper, better safe then sorry! 

     I know this must be really confusing this is kinda a harder skirt so just breathe and hang in there in, if you get frustrated walk away and come back later. I had to do that a couple of times! 


Step 9: Elastic

     I wanted this skirt to be adjustable. We are going to add elastic just to the back part. So sew 3 - 4 small button holes on each end of your elastic. Insert it in the back waist band, hook the first button hole on the button and adjust as needed.


 Then just attach you big button and button hole to your extra inch on your waist band and your skirt is finished!  


     I know this is a trickier skirt! It is so worth it though trust me! Look at how gorgeous it is! I can't wait to make myself one. Take your time and email me if you have any questions. 

                                     ~A 


Photobucketlil luna link party button
Laugh, Love, & Craft