I am sure you all know the amazing Leanne Barlow of Elle Apparel, if you don't know her blog is here . She has lots of fabulous tutorials and an Etsy shop that sells her own handmade and personally designed clothes! Here are a few of my favorites!
Aren't they gorgeous?! I love stripes! I am pretty sure this cardigan is going on my Christmas list. Anyway she made this gorgeous skirt called lace for days, and made a tutorial for it.
Isn't it stunning?! I love it and fully intend on making myself one as soon as I find some lace I fall in love with. Well I was at one of my favorite stores the other day and found some red lace and fell immediately in love with it. The problem was it was only about an inch wide. I had to get it though. So I decided I would make a lace skirt for Sophia out of it. It turned out perfect! I am in love with it. I had to tweak a few steps to get it to work the way I wanted it to. Leanne has been gracious enough to let me use her tutorial and my tutorial combined to show you how I made it. So enjoy and I hope it makes since!
If you want to just make yourself one and not a little girl one go here. That is the link directly to her Tutorial.
The tutorial will go like this, whatever steps of Leanne's tutorial I used I will just link back to her post since they are her original steps. Whatever I changed I will post on here.
What you will need:
~ Depending on the size of your little girl, 1/2 yrd - 1 yrd of fabric that matches your lace. Sophia is 18 months and I got a half yard and it was more than enough!
~ 4-5 yrd of lace depending on thickness.
~ 1 inch wide elastic about 10-12inches of it.
~ 1 larger Button, 2 small buttons
~ Skirt to measure with for your little girl use a skirt one size bigger than she is.
~ Zipper
Step 1: Measure skirt
Here is the link to Leannes step one. I just want to make a note of a couple things. If your skirt has elastic in it make sure you stretch it out when you measure it for your pattern. Also while you are cutting out cut out one piece of elastic the length of your waist band.
Step 2: Cut out Material
Step 3: Lace, This is where I strayed from Leanne's.
Take your two skirt pieces and cut out your strips of lace. Look at Leanne's Step Seven and she gives you some tips on cutting lace. Do cut out two pieces for front and back like she said. DO NOT sew up the sides of the lace, we will take care of that later.
Step 4: Sew lace to skirt
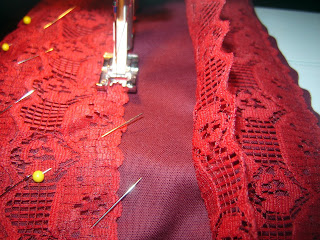
Pin the lace on both sides of your skirt. Making sure the bottom of the previous row gradually overlaps the top of the next row.
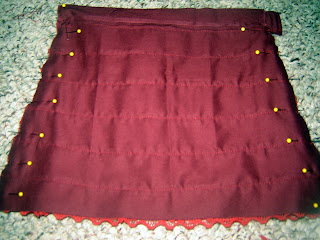
I pinned all of my lace on first then sewed it but you can do it row by row if that is easier for you. Anyway sew along the top of each row, till all your lace is connected.
It should look something like this when it is done.
Step 5: Hem
Now you are going to hem the bottoms of your pieces. I know it's kinda weird to hem them when they are apart but it will make your life easier. Leanne shows you how is Step 5. I only hemmed a half an inch instead of the full inch under that she did. Just make sure that you do it exactly the same on both pieces so they match up when we sew the two pieces together!
Step 6: Waist Band
Take the two shorter waist band pieces sew along the top, iron the seam then turn right side out and iron down. Do the same with the two longer pieces.
Now attach the longer piece to the front piece of your skirt. Make sure you leave the extra inch hanging off the edge. Don't center it. Iron the waist band seam so the waist band is nice and crisp and lays flat.
Now here comes the tricky part. Before you attach the other waist band to the back we are going to add buttons and a slit. So unfold your waist band and attach a small button to both ends. Then right next to each button sew an inch wide button slit to fit your elastic in. Make sure you do this on both ends of your waist band!! Fold your waist band back up and attach to the back piece of your skirt, making sure the buttons and holes will be on the inside of the skirt.
Step 7: Sew together
Now pin the right sides of your skirt together. Make sure you align your skirt really well so everything is lined up when you flip it right side out. Sew all the way up the side that doesn't have the extra inch. The side that does stop sewing at the point where you want your zipper to be. I went a little more than halfway up my skirt then stopped.
Step 8: Zipper
Leann has a great link on how to insert a zipper. Over on Step Six. Have the top of the zipper start at the base of the waist band not at the top of the skirt. I added the zipper at the last minute because this lace and fabric has no give. I know having a zipper and elastic is like double duty but I really wanted to make sure the skirt would go over Sophia's diaper, better safe then sorry!
I know this must be really confusing this is kinda a harder skirt so just breathe and hang in there in, if you get frustrated walk away and come back later. I had to do that a couple of times!
Step 9: Elastic
I wanted this skirt to be adjustable. We are going to add elastic just to the back part. So sew 3 - 4 small button holes on each end of your elastic. Insert it in the back waist band, hook the first button hole on the button and adjust as needed.
Then just attach you big button and button hole to your extra inch on your waist band and your skirt is finished!
I know this is a trickier skirt! It is so worth it though trust me! Look at how gorgeous it is! I can't wait to make myself one. Take your time and email me if you have any questions.
~A


8 comments:
The skirt turned out gorgeous! Great job with the tutorial. I love that you made the waistband adjustable. Brilliant.
Thank you! and thanks again for sharing!
That turned out so well! Great tutorial...thanks for sharing it!
Thank you!
This skirt has been on my mind for months (I saw the original post in adult size months ago) but I just hadn't figured out when I'd try it. You're tut is great! Maybe I'll just suck it up and make one for my 4 yr-old.
Stalking you from Not Just A Housewife
Thanks so much! Try it! I am in love with Sophia's! You won't regret it once it's done.
That is really cute on your pretty girl! Thank you for sharing!
This is really cute...thanks for the tutorial. Would love it if you would link this up to our Rockin' link party going on now at RoCa and Company. Here is the link: http://rocaandcompany.blogspot.com/2011/11/you-rock-10.html. Come and show off what you got. Hope to see you there...
Remember...YOU ROCK!!
Carmen @ RoCa and Company
www.rocaandcompany.blogspot.com
Post a Comment